


 As the amplifier circuit also uses a number of frequencies to drive the loudspeaker, the bass frequencies will be reduced. Therefore need to be plugged the bass-boost control at fedback loop amplifier, this is done to overcome the decline in quality.


Strictly speaking, this simple circuit shouldnt work! How could anyone expect an ordinary light dependent resistor photo cell to see through a fingertip in natural daylight and detect the change in blood flow as the heart pulsates? The secret is a high gain circuit, based on a dual op amp IC which can be either the low power LM358 or the JFET TL072. The LDR is connected in series across the 9V battery supply via a 100kO resistor (R1) and the minute signal caused by the blood pulsing under the skin is fed to the non-inverting (+) input, pin 3, of IC1a via a 0.µF capacitor.
Pin 3 is biased by a high impedance voltage divider consisting of two 3.3MO resistors. The feedback resistors to pin 2 set the gain to 11 times. The output of IC1a is fed via a 0.47µF capacitor and 220kO resistor to IC1b. This is configured as an inverting op amp with a gain of 45 so that the total circuit gain is about 500. The output of IC1b is used to drive an analog meter which may be a multimeter set to the 10V DC range or any panel meter in series with a resistor to limit the current to less than its full-scale deflection. The prototype used an old VU meter with a 47kO resistor fitted in series.
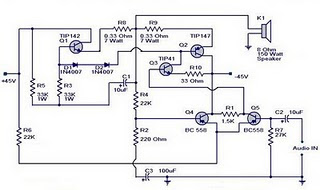
Circuit diagram:

Heart Rate Monitor Circuit Diagram
Note that the unit was designed to use the Dick Smith Electronics light dependent resistor (Z-4801). Other LDRs may require a change in the value of resistor R1. A light source such as a high brightness LED is not required. All that is needed is a reasonably well-lit room, preferably natural daylight, to produce a healthy swing of the needle. Only when the hands are very cold does it make it a little more difficult to accurately count the pulses. To check your heart rate, carefully position your thumb or finger over the LDR and count the meter fluctuations for a period of 15 seconds. Then multiply the result by four to obtain your pulse rate. The circuit can not be used if you are walking or running, etc.


