Showing posts with label light. Show all posts
Showing posts with label light. Show all posts
Wednesday, November 19, 2014
Traffic Light 20 Chanel based on 74LSxx
This view of the proposed traffic Light 20 Chane based only on family and 74LSxx IC 555 as clock source. It is a digital logic circuit. To construct the traffic light rangkaian Control requires no programming of microcontrollers.
This page features a circuit that has twenty open collector outputs that turn on one at a time in a continuous sequence. The circuit make use of the family 74LSxx TTL integrated logic devices. The circuits are designed to drive light emitting diodes or low current and low voltage incandescent lamps, but can also lead to other charges of 80 milliamps.
notes:
This page features a circuit that has twenty open collector outputs that turn on one at a time in a continuous sequence. The circuit make use of the family 74LSxx TTL integrated logic devices. The circuits are designed to drive light emitting diodes or low current and low voltage incandescent lamps, but can also lead to other charges of 80 milliamps.
notes:
- The low output go in sequence from 1 - 0 and back to 1 -0
- At the clock rate of the 555 timer
- c3 = 1uf to 10uf depending on the rate of change desured
- R2 (Variable resistor) in use to determine the timer

Sunday, November 9, 2014
Automatic Low Power Emergancy Light
Here is a white-LED-based emergency light that offers the following advantages. 1-It is highly bright due to the use of white LEDs. 2-The light turns on automatically when mains supply fails, and turns off when mains power resumes. 3-It has its own battery charger. When the battery is fully charged, charging stops automatically. The charger power supply section is built around 3-terminal adjustable regulator IC LM317 (IC1), while the LED driver section is built around transistor BD140 (Q2).
In the charger power supply section, an input AC main is stepped down by T1 to deliver 9V, 500mA to the bridge rectifier, which comprises diodes D1 through D4. Filter capacitor C1 eliminates ripples. Unregulated DC voltage is fed to input pin 3 of IC1 and provides charging current through D5 and limiting resistor R15. By adjusting preset P1, the output voltage can be adjusted to deliver the required charging current. When the battery gets charged to 6.8V, D6 conducts and charging current from IC1 finds a path throughQT1 to ground and it stops charging of the battery. When mains power is available, the base of Q2 remains high and Q2 does not conduct. Thus LEDs are off.
On the other hand, when mains fails, the base of Q2 becomes low and it conducts. This makes all the LEDs glow. The mains power supply, when available, charges the battery and keeps the LEDs off as Q2 remains cut-off. During mains failure, the charging section stops working and the B1 supply makes the LEDs glow. Assemble the circuit on a general-purpose PCB and enclose in a cabinet with enough space for battery and switches. We have tested the circuit with twelve 10mm white LEDs. You can use more LEDs provided the total current consumption does not exceed 1.5A. Driver transistor Q2 can deliver up to 1.5A with proper heat-sink arrangement.
Circuit diagram:

P1 = 2.2K
R1-R12 = 100R-1/2W
R13 = 1K-1/2W
R14 = 180R-1/2W
R15 = 16R/5W
R16 = 1.2K
C1 = 1000uF-25V
D1-D5 = 1N4007
D6 = 6.8V-0.5W Zener
D7-D18 = 10mm- White LEDs
Q1 = BC548
Q2 = BD140
B1 = 6V-4.5Ah Battery
IC1 = LM317
T1 = 9Vac-Transformer
Read More..
In the charger power supply section, an input AC main is stepped down by T1 to deliver 9V, 500mA to the bridge rectifier, which comprises diodes D1 through D4. Filter capacitor C1 eliminates ripples. Unregulated DC voltage is fed to input pin 3 of IC1 and provides charging current through D5 and limiting resistor R15. By adjusting preset P1, the output voltage can be adjusted to deliver the required charging current. When the battery gets charged to 6.8V, D6 conducts and charging current from IC1 finds a path throughQT1 to ground and it stops charging of the battery. When mains power is available, the base of Q2 remains high and Q2 does not conduct. Thus LEDs are off.
On the other hand, when mains fails, the base of Q2 becomes low and it conducts. This makes all the LEDs glow. The mains power supply, when available, charges the battery and keeps the LEDs off as Q2 remains cut-off. During mains failure, the charging section stops working and the B1 supply makes the LEDs glow. Assemble the circuit on a general-purpose PCB and enclose in a cabinet with enough space for battery and switches. We have tested the circuit with twelve 10mm white LEDs. You can use more LEDs provided the total current consumption does not exceed 1.5A. Driver transistor Q2 can deliver up to 1.5A with proper heat-sink arrangement.
Circuit diagram:
Fully Automatic Emergency Light Circuit Diagram
Parts:P1 = 2.2K
R1-R12 = 100R-1/2W
R13 = 1K-1/2W
R14 = 180R-1/2W
R15 = 16R/5W
R16 = 1.2K
C1 = 1000uF-25V
D1-D5 = 1N4007
D6 = 6.8V-0.5W Zener
D7-D18 = 10mm- White LEDs
Q1 = BC548
Q2 = BD140
B1 = 6V-4.5Ah Battery
IC1 = LM317
T1 = 9Vac-Transformer
Tuesday, November 4, 2014
Light Controlled Pond Pump
This circuit was constructed to control the pump in a garden pond, so that it automatically turns on at dawn and off again at dusk. Not only does this mean that we don’t have to get cold and wet when turning the pump on or off manually but it’s also one less job for our kind neighbours when we go away on holidays! The controller is powered from the pump’s existing 25VAC mains transformer. A bridge rectifier (BR1) and 1000μ F capacitor provide DC power to the circuit. For dependable operation, this is regulated to +12V by a 7812 regulator (REG1), while a red LED (LED1) provides power-on indication. The light sensor (LDR1) is a Cadmium-Sulphide photocell obtained from Tandy Electronics. The photocell forms a voltage divider with trimpot VR1.
Light-Controlled Pond Pump Circuit diagram:
With no light on the photocell, the voltage on the base of Q1 is greater than 0.6V and therefore it is switched on. When light falls on the photocell, its resistance decreases, lowering the bias voltage on Q1 and switching it off. This in turn allows Q2 to switch on, energised the relay and turning on the pond pump. In use, the 2.2MΩ trimpot is adjusted so that the pump cuts out at the desired light level. A 47μ F capacitor across LDR1 prevents transient light changes from affecting circuit operation. S1 is a miniature SPDT centre-off toggle switch, allowing the pump to be turned on or off manually, or switched to automatic mode.
The circuit was constructed on a small protoboard from Dick Smith Electronics (Cat. H 5604) and housed in a bulkhead box, which was then attached to the transformer housing. The photocell was soldered to a length of figure-8 cable and sheathed in a short length of heatshrink tubing to form a light probe. This was attached to a nearby fence post to provide suitable exposure to sunlight.
Author: Ian Hogan - Copyright: Silicon Chip Electronics
Thursday, September 18, 2014
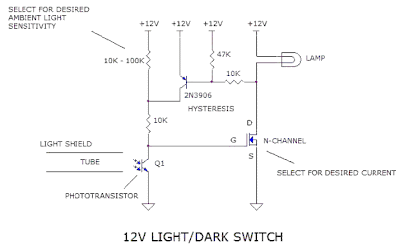
12v Light Dark Switch
Often, for certain low voltage lighting systems; you would like to turn off the lights during the bright light of the day. Most commercial day/night switches are designed for AC lighting. This hobby circuit below was designed for a 12v DC system. But, it could be modified for other voltage as well. It uses an inexpensive photo-transistor as the light detector. An n-channel FET is used to switch power to the lights. A transistor circuit is included to provide some hysteresis.
This keeps the circuit from fluttering the light during the transition from day to night and night to day. It is recommended that a plastic tube be placed over the transistor to prevent it from being illuminated by the lights it is controlling. By selecting the appropriate power FET, the circuit could control over 100 watts worth of 12v lighting. (July 22, 2008)
Source: DiscoverCircuits
Friday, September 5, 2014
Street light circuit
The schema diagram present here is that of a street light that automatically switches ON when the night falls and turns OFF when the sun rises.In fact you can this schema for implementing any type of automatic night light.
The schema uses an LDR to sense the light .When there is light the resistance of LDR will be low.So the voltage drop across POT R2 will be high.This keeps the transistor Q1 ON.The collector of Q1(BC107) is coupled to base of Q2(SL100).So Q2 will be OFF and so do the relay.The bulb will remain OFF.
When night falls the resistance of LDR increases to make the voltage across the POT R2 to decrease below 0.6V.This makes transistor Q1 OFF which in turn turs ON Q2.The relay will be energized and the bulb will glow.
Notes.
* POT R2 can be used to adjust the sensitivity of the schema.
* You can use bulb of any wattage ,provided that relay should have the sufficient rating.
* The schema can be powered from a regulated 9V DC power supply.
* The relay K1 can be a 9V SPDT relay.
Subscribe to:
Posts (Atom)
